The Microscope
Laboratory – Effective Use and Care of the Microscope
Objectives:
- Describe and demonstrate how to carry, clean, use, and store a compound light microscope.
- Identify all parts of the microscope and describe their function.
- Learn to calculate total magnification for each objective lens.
- Learn the relationship between working distance, field of view and illumination.
- Measure the diameter of a cell.
A compound light microscope is used to observe structures that can’t be seen with the naked eye, structures that are below the normal resolution of our eyes. These can be cells, tissues, organs, etc.
The compound microscope used two types of lenses, the ocular lens and the objective lens, as they are used simultaneously, they magnify the image.
The compound light microscopes we have in the lab can magnify an object up to 1000X.
Learning microscopy is very important for us, we can examine different types of cells and tissues and make correlations between their structure and function. We can also compare normal and disease state cells, as changes in the normal structure are part of a particular disease process.
Care and Transport of a Microscope
We must learn how to use, care for, and transport the microscope because it is an expensive and an essential tool required in our laboratory.
Transport
- To take the microscope out of the cabinet, use the following instructions:
- Use your dominant hand to hold the arm of the microscope, and your non-dominant hand to hold the base of the microscope.
- Carry the microscope upright. That way the ocular lenses located in the eyepiece do not fall out.
- Make sure the electrical cord is wrapped or removed from the microscope, avoid tripping on the cord.
- Place the microscope on a table in front of you.
Care
- Turn off the microscope.
- Turn the intensity of the light to the lowest level.
- Turn the revolving piece to have lowest magnification, usually 4X.
- Disconnect from power source.
- Wrap cord around the microscope.
- After you have used the microscope, make sure to clean the lenses, particularly the 100X with lens paper to remove any remnant of immersion oil.
- Place the microscope back in the cabinet using the transport instructions.
Clean the Lens
- Moisten the end of a Q-tip with lens cleaner.
- Clean the topical surface with the wet end and dry it with the other end, using circular motion.
- Start with the scanning objective and move your way up to the immerse oil objective, changing the cotton swab for each objective.
- Use alcohol for difficult cleaning and only as last resort use xylene, Regular use if xylene will destroy the lens coating.
Parts of the Microscope
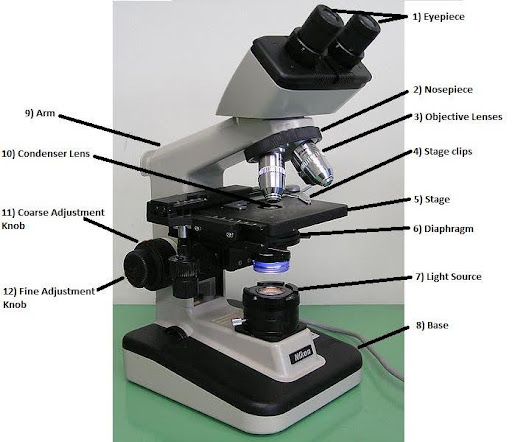
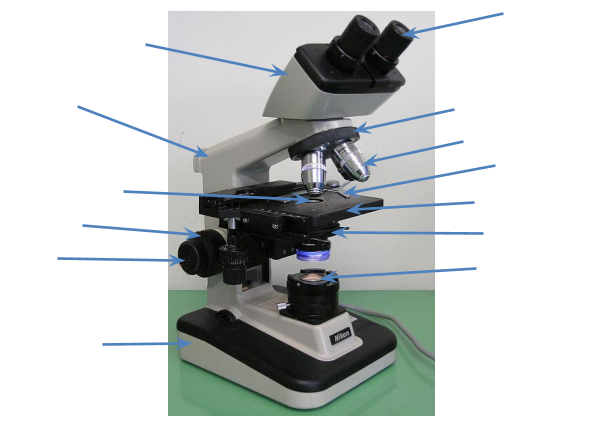
Description and Function of the Parts of the Microscope
- Eyepiece – removable, holds ocular lenses. Typically, these lenses magnify the image 10X.
- Revolving nosepiece – contains the objective lenses.
- Objective lenses – Mounted in the revolving nosepiece, typically a microscope has 4, the 4X, 10X, 40X and 100X.
- Head – Upper part, contains the ocular lenses and the rotating nosepiece with the objective lenses.
- Stage clips – located in the Stage, their function is to hold the slide in place.
- Stage – Platform located below the objectives where the slide is placed.
- Mechanical stage – holds the slide in place (with clamp), can be moved using the adjusting knobs.
- Iris-diaphragm – located beneath the condenser, regulates the amount of light by opening or closing its aperture.
- Light – light source, usually a bulb built in the base of the microscope, it has a dial to regulate the intensity of light.
- Condenser – located below the stage, contains a lens that condenses light through the specimen.
- Arm – The area of the microscope that connects the base to the head, it can be straight or curved depending on the microscope.
- Base – The wide bottom of the apparatus, it supports the microscope.
- Coarse focus – large knob located on each side of the microscope toward the base, it moves the stage up or down quickly, used for coarse focusing.
- Fine focus – small knob located on each side of the microscope, usually inside the coarse knob, used for precision focusing.
Calculating magnification
The total magnification is determined by multiplying the ocular lens power by the objective lens power.
Relationship between magnification, working distance and field of view
There is an inverse relationship between the objective lens magnification and the working distance, field of view and intensity of the light (shown in the figure 2)
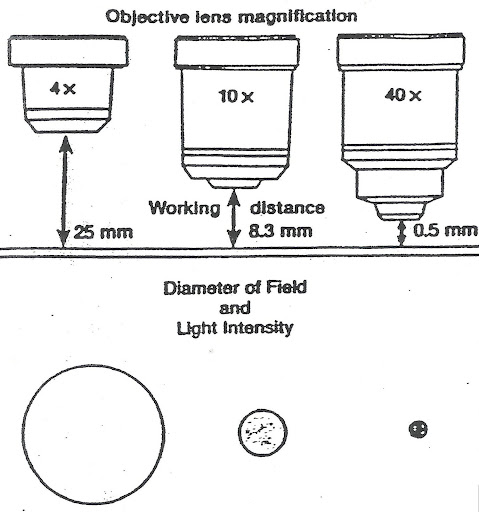
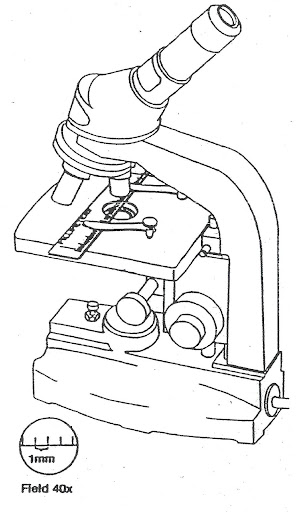
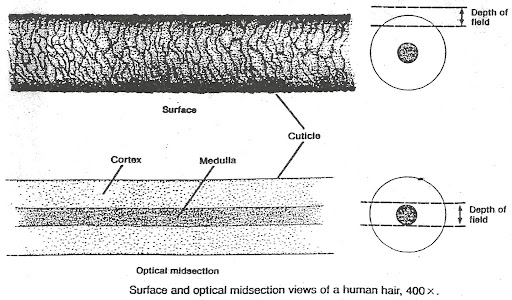
Lab Activity
- Identify the part of the microscope, use figure provided above.
- Calculate total magnification using the microscope objectives available:
| Ocular lens | Objective name | Objective Magnification | Total Magnification |
| 10X | Scanning power | 4X | |
| 10X | Low power | 10X | |
| 10X | High power | 40X | |
| 10X | Immersion oil | 100X |
- Look at the letter e and draw what you see

For 100% online courses – watch the following video;
- Using a microscope slide of simple squamous, cuboidal or columnar epithelium, draw and measure the dimensions of a one cell.

For 100% online courses – use the UM virtual microscope, choose any of the three slides listed here. Please note you will not be able to measure the dimension of the cell. This microscope does not have a scale included.Simple squamous – UM slide #030: Mesentery, H&E, 40X (simple squamous epithelium in blood vessels and at surface).
Simple cuboidal – UM slide # 210: Kidney, H&E, 40X (simple cuboidal epithelium).
Simple columnar – UM slide # 029-1: Small intestine, H&E, 40X (simple columnar epithelium, simple squamous epithelium).
Assessment
- What is the total magnification achieved when using the scanning objective?

- What is the total magnification achieved when using the immersion oil objective?

- How does the diameter of the scanning power field of view compare with that of the low power field?

- What change occurred in the light intensity of the field of view when you change from the low power objective to high power objective?

- After looking at the letter e, what has the lens system of the microscope done to the image?

- When you move the image to the right, what direction did the image move in the field of view?

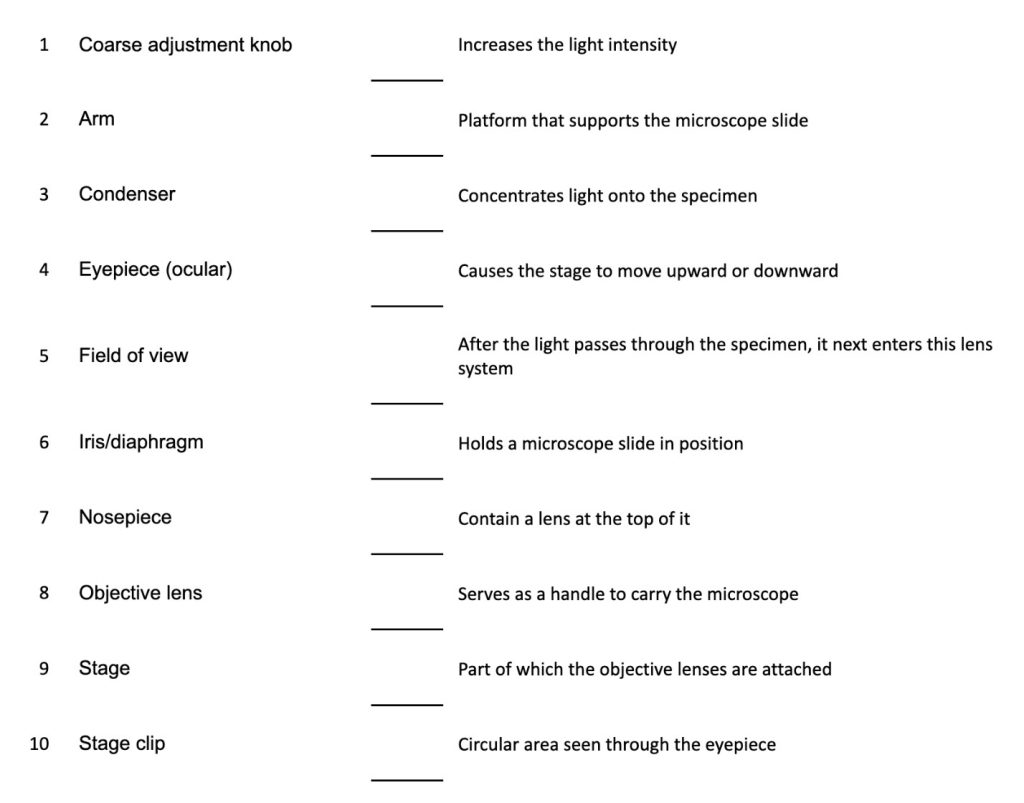
- Match the names of the microscope parts with the descriptions
Media Attributions
- Microscope parts © Wikipedia is licensed under a CC BY-SA (Attribution ShareAlike) license
- Lens magnification © LibreTexts is licensed under a CC BY-SA (Attribution ShareAlike) license
- Diameter of field is licensed under a CC BY-SA (Attribution ShareAlike) license
- Human hair © Maria Carles is licensed under a CC BY-SA (Attribution ShareAlike) license
- The Microscope Laboratory © Maria Carles adapted by Wikipedia is licensed under a CC BY-SA (Attribution ShareAlike) license
- Blank circle © Maria Carles is licensed under a CC BY-SA (Attribution ShareAlike) license
- The Microscope Question 9

