
The text in this chapter is broken up by images and various text boxes in an effort to make the text more readable to some neurodivergent readers. The result, frankly, is more engaging for all learners, and more work like this needs to be done throughout the book. This page was worked on by students in an open pedagogy assignment. More information is available in the credits at the bottom.
When I ask students about their proofreading strategies, they frequently tell me that they read over the paper before they hand it in. When I ask them how well that has worked for them in the past, they shrug. When I ask them to reread something they have handed in a while ago, they get embarrassed and sometimes even mad at themselves because they are seeing errors that they believe they should have caught. The problem, I tell them, is their proofreading strategy, and we get to work trying out alternatives.
In this section, I present a number of proofreading strategies that students have told me work for them. Not all of them work for me; not all of them will work for you. I recommend, though, that you try them, particularly some that you haven’t tried before. You might be able to find more error than you have in the past.
 Proofreading vs. Editing
Editing and proofreading require different work, but both require attention to detail. Proofreading is about finding small errors, like typos or missing commas, while editing often involves more substantial work on sentence structure.
However, as I noted in the last section, proofreading and editing are not entirely separate. Be wary, though, of treating them as if they are the same task. If you start proofreading, but switch to editing a few rough sentences, be sure that you switch back to proofreading mode so that you don’t miss the typos!
Hearing the Text: Strategies for Good Ears
Some people can hear problems in their writing much more easily than they can see them, so these variations all rely on you being able to hear what you have written. The strategies below tend to work better when you are able to make marks on a hard copy of your paper, so I recommend that you print your paper out, no matter which you try.
- If you are good at reading out loud exactly what you have written—mistakes and all—you can try reading out loud to yourself. Make corrections as you go, or leave marks (highlighting, underlines, circles) to make corrections later.
- You can ask a friend to read your text out loud to you. This will work best with someone who hasn’t worked with you on other revisions, so they don’t know in advance what you mean. This time, you want to mark places where your reader stumbles or has to back up to read a sentence, as well as places where one or the other of you sees errors. This strategy often works best with two hard copies, one for you and one for your partner.
- You can have your computer read the text out loud to you (see “Tech Talk,” below). Keep in mind that a computer won’t stumble or back up. It also won’t stop until you tell it to. You’ll need to be ready to use some quick-marking techniques if you use this strategy.
Tech TalkMost word-processing software and operating systems have methods for turning text into speech. Microsoft Word® has a “Read Aloud” feature on the Review tab. Google Docs™ has an option to turn on speech under “Accessibility Options” in the Tools menu. Windows® includes a “Narrator” feature in the Ease of Access tools. Apple® computers include a speech option in the Accessibility section of the System Preferences menu.
By the time you read this, however, these options may have changed, and specific instructions may vary for the version of software and/or browser that you are using.
If you’d like to try computer reading and these instructions don’t work, search online for specific instructions for your system and software.
Seeing the Text: Strategies for Good Eyes
Some people see error better than they can hear it. However, finding error this way works better when we change the way the text looks. You can then proofread using your screen or a hard copy, whichever works better for you.
- Change the size or typeface of the font you are using. Changing font types and sizes changes where the beginnings and endings of lines appear, which means that you’re more likely to see errors.
- Most word processors default to using a sans serif font; try a serif font or a different typeface.
- Make the entire text 18-point or even larger.
- Shrink your window size so that you can only see a few lines at a time. This can help you focus on the words in those lines instead of the flow of the paragraph.
- Make every sentence into a separate paragraph (see the activity below).
- This approach can work well in conjunction with shrinking your window size, since each sentence will be separated from the ones around it.
- For an added bonus, this approach can also help you see when you have sentences that begin the same way or too many sentences of the same length in a row.
- It can also help you find dropped quotations.
 Example: Changing Font Size
Compare these two versions:
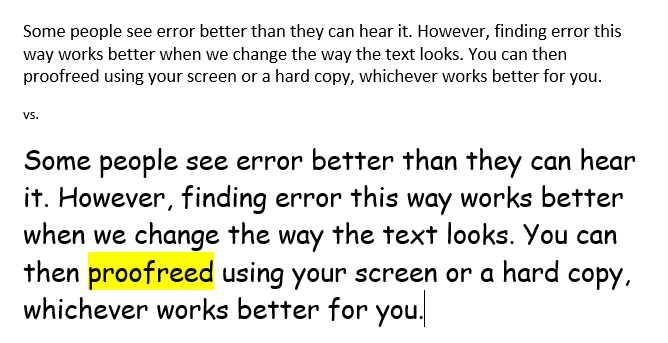 The first sample was done in Calibri, the default font in Microsoft Word®, though I made the point size 14 so that it would be a little more readable.
In the second sample, you can better see errors. I changed the size font to 20, as well as set the font to Comic Sans to better read the work. As you can see, you can better see I mistyped “proofread” and I’m now able to fix that.
Serif vs. Sans Serif
Serif fonts have little decorative strokes on the letters. Examples of serif fonts include Times New Roman, Palatino, and Garamond. These fonts tend to work better in print than on screen for most readers.
Sans Serif fonts have no such decorations. Examples of sans serif fonts include Arial (the default font for Google Docs™) and Calibri (the default font for Microsoft Word®).
 Activity: Turning Sentences into Paragraphs
First, a few cautions:
- As of this writing, this doesn’t work in Google Docs, so the instructions below are for Microsoft Word only. If you are using Word on a Mac, you will need to use the Advanced Find and Replace.
- Follow these instructions carefully. If you misplace or forget a period, it can be hard to put your paper back in essay format. Some students opt to do this on a copy of their paper, using the spaced-out version to make notes about changes, but making the changes on the original version.
- If you are doing this on the original copy of your paper, be sure to double-check it after you have completed your revisions and converted your paper back to essay format. You want to be sure that your paragraphs are all as they should be.
- Do not try to fix your Works Cited or References list with this technique. This process makes a mess of that list.
Step 1: Convert Your Paper
Open your paper in Word, and take the following steps:
- Click on the “Replace” button on the right side of the Home tab.
- In the dialog box that opens, type the following:
- In the “Find what” blank: Type a period and a space.
- In the “Replace with” blank: Type a period, a caret (Shift-6), the letter “p”, another caret (Shift-6), and another letter “p.”
Note: If you have trouble with the ^p^p part, choose “More” (which becomes “Less” when you click on it) and then “Special” and then “Paragraph Mark” twice. Make sure your cursor is in the “Replace with” blank before you click on the “Paragraph Mark.”
- Click “Replace All.”
Step 2: Edit and Proofread
Using this version, do your editing and proofreading work. Be careful as you edit. Try not to add periods or spaces between sentences, which can also make returning your paper to essay format more difficult.
Step 3: Put Your Paper Back in Regular Format
Assuming you are doing your edits on the same copy you intend to use, you can put it back in regular paragraph form. You just need to reverse the search:
- Click on the “Replace” button on the right side of the Home tab.
- In the dialog box that opens, type the following:
- “Find what:” Type a period, a caret (Shift-6), the letter “p”, another caret (Shift-6), and another letter “p.”
- “Replace with:” Type a period and a space.
Again: If you have trouble with the ^p^p part, choose “More” (which becomes “Less” when you click on it) and then “Special” and then “Paragraph Mark” twice. Make sure your cursor is in the “Find what:” blank before you click on the “Paragraph Mark.”
- Click “Replace All.” Once your paper is back in essay format, double-check to make sure that all of your paragraphs return to the way you want them.
Moving: Strategies for Kinesthetic Writers
Some people think better when they are moving around or when they are moving things around. If this describes you, try these strategies.
- Pace. Get a clipboard, print out your paper, and walk around while you read. Make notes or marks for later changes as you go.
- Print out your paper and cut it up so that you only have one paragraph to work with at a time. Tape together paragraphs that bridge pages. Then pick a paragraph, and start marking it up. For some added benefit, choose paragraphs at random so that the ideas are always moving around, too.
Checking Details
Sometimes, we know where the trouble spots are. We know that we have particular problems with commas or an author’s name or there/their/they’re. It can be helpful to create a checklist for yourself of specific things to look for. For many of these, you can leverage your word processor’s search function to locate the problem spots more efficiently.
Here are some common trouble spots.
Author’s names
Some authors have names that show up as misspellings, so it’s easy to skip over those red squiggles in your word processor. One trick is to add the correct spelling to your word processor’s dictionary so that it will only mark the ones that are truly misspelled.
Commas
Commas are a confusing mark of punctuation for many people, and comma splices are one of the most common errors for early college writers.
If you struggle with commas, first, become familiar with the most important comma rules. Tons of sites online have this information; don’t worry about the number of rules they list, just choose a reputable one like the Purdue OWL or other university website. Then, you can search for commas and carefully proofread to make sure that the ones you have are in the correct place. You’ll have to read carefully, though, to add the ones you’re missing. If you aren’t sure, check with a tutor, your professor, or a friend who seems to understand commas well.
Example: Comma SplicesCommas splices happen because writers know that the ideas in two independent clauses belong closer together than an “and” can bring them, but they aren’t sure about how to do this grammatically. Here is a comma splice:
“Solar winds are made up of charged particles originating from the Earth’s Sun, these winds can disrupt satellites and power grids.”
When you have a pair of clauses like this, the comma isn’t strong enough to hold these ideas together—or splice them. To fix this error, you can do a number of things:
Join them with a coordinating conjunction.
“Solar winds are made up of charged particles originating from the Earth’s Sun, and these winds can disrupt satellites and power grids.”
This solution doesn’t work particularly well because the “and” makes the two parts feel too separated.
Use subordination to turn one of the clauses into a dependent clause.
“Solar winds, which are charged particles originating from the Earth’s Sun, can disrupt satellites and power grids.”
OR
“Solar winds, which disrupt satellites and power grids, are made up of charged particles originating from the Earth’s Sun. “
This solution is better in this case, but the one you choose would depend on what you want to emphasize.
Turn one of the independent clauses into a phrase, in this case, one that modifies “solar winds.”
“Solar winds, charged particles originating from the Earth’s Sun, can disrupt satellites and power grids.”
OR
“Solar winds, disrupters of satellites and power grids, are made up of charged particles originating from the Earth’s Sun.”
Again, this solution is better, and you would make a choice depending on what you want to emphasize.
Turn the sentences into a simple sentence with a compound verb.
“Solar winds are made up of charged particles originating from the Earth’s Sun and can disrupt satellites and power grids.”
Again, this one is better than the original. Because it depends on coordination, you would be giving equal emphasis to the two parts.
I have provided a handful of solutions here, but there are many more. The point is for you to understand that when you run into a comma splice, you will want to think actively about how to create the emphasis you want in your sentence.
Quotations
Double-check your quotations. Keep in mind that everything inside of quotation marks (with a few minor exceptions) needs to be exactly what is in the original text. Errors in quotations can indicate a kind of carelessness, particularly since these kinds of errors are avoidable. When you are checking your quotations, it is also a good time to check that you have the correct citation information.
Just as there are specific rules for commas, there are specific rules for quotation marks, but these are simpler:
- Periods and commas go inside quotation marks. This is true even if they aren’t part of the original sentence.
- Question marks, semicolons, and all other punctuation marks can go either inside or outside, depending on whether they are part of your sentence or part of the sentence you are quoting. If they are part of your sentence, they go outside. If they are part of the original sentence, they go inside.
- Citations do not belong inside of quotation marks. They are your marks about where the source is located; they are not part of the original.
If you search for quotation marks, you can find these easily.
 Key Points: Proofreading
- Do not just “read over” your writing. Choose a proofreading technique that works for you, such as reading aloud, changing the text’s appearance, or moving while you proofread.
- Check for specific details, including the spelling of authors’ names and comma usage. Also check that everything inside of quotation marks is exactly what’s in the original and that you have used punctuation around quotation marks correctly.
Text Attribution
Material in this section was revised with the help of Waldy Baez, Ameir Mahmoud, and Latrell Williams, students in my class during Fall 2022.
Media Attribution
“Good Proofreading Environment” by Waldy Baez, Ameir Mahmoud, and Latrell Williams is licensed under CC BY-SA 4.0. The original photograph was cropped slightly by Patricia Lynne.
The idea for “Change Text Size” came from work by Waldy Baez, Ameir Mahmoud, and Latrell Williams. The original file would not display correctly, so Patricia Lynne has redone the work. Credit should be given to both the original student contribution and, if copied, to my work, licensed under CC BY-SA 4.0.
Relating to a person's awareness of the position and movement of the parts of the body.
A grammatical error in which two independent clauses are linked together with a comma, which is not a strong enough piece of punctuation for this work.
A word that joins parts of sentences or whole sentences that are of equal importance. There are only seven of them: for, and, nor, but, or, yet, so (FANBOYS). See also "coordination."
A sentence structure that gives differential weight to the ideas in each of the clauses, with one idea being less important than the other.
A group of words containing a subject and a verb that can stand on its own as a sentence.
A small group of words in a sentence that form an idea but that do not make up a sentence on their own. See also "independent clause" and "dependent clause."
A sentence structure that gives equal weight to the ideas in each of the parts of a sentence.
