
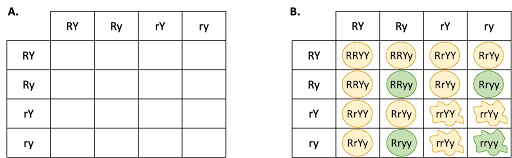
Using an expanded Punnett square
The multiplication rule of probability offers a straightforward way to quickly calculate the probability of offspring with a particular combination of traits. However, sometimes it is nice to have a visual representation of all of the possible progeny from a particular cross. In this case, an expanded Punnett square can be constructed. In this section, we construct a two-gene Punnett square for a dihybrid cross, using the F2 offspring of Mendel’s Yellow, Round x green, wrinkled cross as an example (RrYy x RrYy).
Note that the rows and columns do NOT list alleles individually, but possible combinations of alleles.
Although it is tempting to think of the Punnett square columns and rows as simply separating individual alleles, what the columns and rows actually represent is the potential gametes that a parent can produce. For example, a monohybrid individual (Yy) can produce gametes with Y or y. A dihybrid individual RrYy can produce gametes with RY, Ry, rY, and ry allelic combinations, so these are the column and row headers that we use for a dihybrid Punnett square. This is shown in Figure 9A. As in the single-gene Punnett square, the rows and columns are filled in according to the headers, as shown in Figure 9B.
When writing genotypes for two or more independently assorting genes, the convention is to write genotypes with both alleles of one gene, followed by both alleles of the next gene (RrYy, not RYry). By convention, any dominant alleles are written first (RrYy, not rRyY).
Figure 9B also labels the phenotypic classes associated with each genotype. Note that there are 16 possible offspring in the two-gene Punnett square. Of them, 9/16 are round and yellow. 3/16 are round and green, 3/16 are wrinkled and yellow, and 1/16 are wrinkled and green. This is the same 9:3:3:1 offspring ratio we saw when using the multiplication rule.
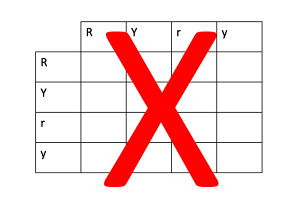
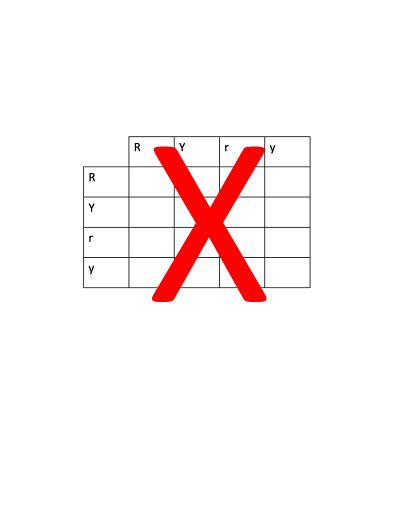
WARNING! A common mistake is to simply split up the four alleles from the dihybrid, as shown in Figure 10. But a dihybrid individual does NOT produce gametes of A, a, B, and b, and it is incorrect to set up a Punnett square with these headers for the columns and rows. You can check your work by making sure that each header has one copy of every gene, and each box representing offspring has two copies of each gene.
Larger Punnett squares can be used to track more genes at a time. The number of rows and columns in an expanded Punnett square is equal to 2n, where n=# of genes. So a single-gene Punnett square has 21=2 rows and 2 columns, and a two-gene Punnett square has 22=4 rows and columns. A three-gene Punnett square fould have 23=8 rows and columns! You can see that constructing an error-free Punnett square becomes exponentially more challenging with additional genes. Although the expanded Punnett squares can be a useful visual representation under some circumstances, the multiplication rule is generally a faster (and less error-prone) way to solve multigene problems.
Test Your Understanding
Media Attributions
- A two gene Punnett square © Amanda Simons is licensed under a CC BY-SA (Attribution ShareAlike) license
- Wrong Punnett square © Amanda Simons is licensed under a CC BY-SA (Attribution ShareAlike) license
